Pom Pom making
Pom poms do not have to be tricky to create, you don't need plastic or cardboard donut shapes...all you need is your hand, some wool and scissors. Pom poms would create wonderful movement on a puppet for hair, eyes, feet or even a complete body. See the video below for the technique, they can be made larger or smaller by using two, three, four fingers or your complete hand.
Wet Felting
Wet felting is the meshing together of wool fibres by agitating them in hot water and soap. Wool, silk and hair fibres have a jagged shaft which will stick to one another, this cannot be done with synthetic fibres as they are completely smooth. This method is used by crafters and artists to create clothes, shoes, hats and sculptural objects. Felting could create a wonderful body texture, hair or even limbs for a puppet.
Here is a briefish you tube video showing the technique, there are plenty more that detail creating three dimensional shapes.
Papier/Flour Mache Scrim
Papier mache can be used as a scrim layer on your puppet head, body or limbs. Simply form the body part with tin foil, newspaper, polystyrene, foam or use an object from around the house or a balloon.
Mix up the mache mix and pre-tear your newspaper or paper towels into small section's.
Flour mix
1 Part plain flour
1 Part hot water
1 teaspoon of salt
Sieve the flour to eliminate lumps
Glue mix
1 Part White glue
1 Part water
Work over the armature saturating each piece on your mix and smoothing it over. Flour Mache will need two layers and Papier Mache will need up to five.

Try to let the layers dry out in between coats as a thick layer will take a long time to dry. You an also pop it into the oven on its lowest setting, take care to check regularly.
The glue mix can be used with fabric to create a very strong surface that will last a long time. Theatres use this to protect the edges of their movable scenery and as a cost effective way to hard coat large props or scenic elements.
Fabric Scrimming
Use the glue mix as detailed above. Most commonly used fabrics are calico and muslin which are cheap and wide and come in a few weights. You could use pretty much any fabric you fancy and other fabrics might give wonderful pattern or texture to your puppet.
Cut up your fabric and soak it in the glue mix. Cut the fabric to suit your project, these could be scales or larger pieces. Here I'm using strips of fabric to suggest eyelids or wrinkles.
Build up the layers of fabric to create your expression. Eyelids and wrinkles work well by folding the fabric over to create a lip.
Creating a Shoulder Cradle
Using a hot glue gun cover a coat hanger in foam both sides. Extend the foam out a small way beyond the edge of the hanger.
Cut the foam into shape using scissors taking
Use the hanger as a template to cut out fabric to form a cover. I have used a felt batting but tights or lycra would be equally suitable.
Put the cover over the foam and stitch or glue closed. The cradle will give you a firm base allowing you to hang arms and the body or clothes of your puppet.
Hinging the arms/legs
Whatever type of puppet you are creating it will need to move convincingly. Hinging its joints correctly will help enormously.
Soft Hinges
This upper arm is just tied to the shoulder cradle, this leaves it free to move in a 360 degree motion just like a shoulder joint does.
The elbow joint is stitched together at the back of the arm only enabling it to bend in one direction.
The wrist is created with two loops stitched and glued to the end of the lower arm and the hand. This gives it a large range of movement but doesn't allow it to rotate completely.
The elbow joint is stitched together at the back of the arm only enabling it to bend in one direction.
The wrist is created with two loops stitched and glued to the end of the lower arm and the hand. This gives it a large range of movement but doesn't allow it to rotate completely.
Video to show the range of movement created by these hinges.
The knee is glued at the back of the join to allow it to bend forwards but not backwards. The heel is similarly glued at the back but the join is cut to a 45 degree angle to allow the foot to flex.
Below is a video to show the movement achieved with these hinges.
The joins can also be created by pin hinges. These are created with a male section shown that slots into the female below.
A pin is then pushed through all sections of the hinge to fix the joint and allow it to move.
Both of these sections need to have rounded top edges to allow the joint to move past each other and a hole through the centre of each.
This type of join requires a stop (similar to a knee cap or elbow) to stop the joint moving beyond where it would naturally flex
The video below shows the range of movements with this type of hinge.
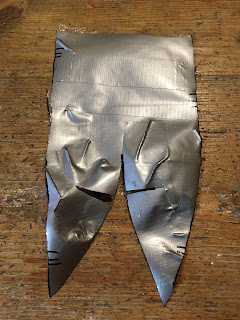
Cling film around the template to stop the duct tape sticking to it.
Cover in strips of duct tape and mark out your cutting lines. Try and simplify your pattern as much as you can. Use notches to ensure you know how to line the pieces up again.
Making a head
Most puppets require a head and here are a few ideas for construction.
Make a base to add features to and scrim. Avoid heavy construction materials as this is very tiring to puppeteer. Plaster, resins, and clay even polymer clay (unless used as a scrim) will be too heavy. Foam, fibreglass, fabrics, cardboard, plastics are all much lighter and can be just as robust.
Your base (or core) can be made from:
Foam
Tinfoil
Clay
Newspapers
If you are using foam or cardboard you will need to have a pattern to cut out pieces and glue together.
Cover in strips of duct tape and mark out your cutting lines. Try and simplify your pattern as much as you can. Use notches to ensure you know how to line the pieces up again.
Your pattern piece will ideally be flat but if it is holding a curve (like my example) you will need to cut into it to release the shape.

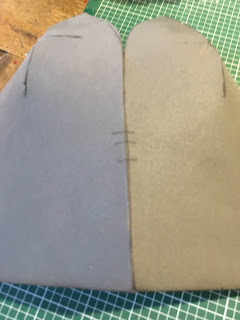
Trace the pattern piece onto whatever you are making the base out of this is 1cm eva foam. It is a little thick for this purpose I would recommend a 5mm thickness. Don't forget to trace your notches onto the pieces.
Cut out your pieces using a sharp scalpel and a cutting mat.
Glue together using hot glue, this is a special contact adhesive hot glue stick from Tyges.co.uk and it has been designed specially for foam of all sorts.
Take care to match up your notches as you go.
The finished dome is a little pointy at the joins. This is due to the thickness of foam that I used plus I cut a rather extreme 45 degree angle into the edges........turns out it was too angular! The foam can be sanded and worked into so it won't effect the final head plus I plan to scrim with fabric which will eliminate the edges entirely.
An alternative core is a shape made from tin foil that can be very quickly assembled. Use even lighter newspaper or foam to pad out the centre.
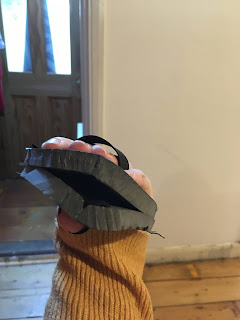
To articulate the mouth you will need a base plate that is hinged and operated by your hand.
Normally the interior is covered in felt or scrimmed and painted. Think Muppets and Elmo.
The thumb and fingers have loops to hold the mouth securely while it is being operated. These need to be snug to the finger to stop slipping.
This is a very quick hinge created with duct tape to the back. It could also be fabric glued to either side.
Making Shadow Puppets
Making Hands
There is more than one way to make a successful pair of hands and the method you choose will depend on how you want to puppeteer. Whatever the construction always ensure that the hand has a life of its own before you even move it, partially curl the fingers to suggest movement and then even if the hand and arm are just hanging by your puppets side there will be the suggestion of life.
Wire Armature
I have used 1.2mm garden wire because that is what I had handy (pardon the pun) anything up to 2mm can be very easily manipulated to form complex shapes like hands. Specialized armature wire is normally aluminium and very soft and comes in a variety of thicknesses. Any model shop should stock armature wire
https://modelshop.co.uk/Shop/Item/Aluminium-wire-soft/ITM2110
Form the outline of the hand and fingers with the wire and secure it off.
Start to build up the wire around the palm of the hand by wrapping, weaving it around the fingers.
Work up and down each finger as you build the layers.
The finished wire hand. This would not be ideal for a finished hand unless it was incredibly stylised so normally wire is covered. It can be covered with a hard finish such as supersculpy or two part epoxy or a soft and flexible finish such as silicone which will allow the wire to remain poseable.
Ours will be covered in fabric, ultimately flesh coloured tights so I am going to need to change the base colour and smooth the whole thing out.
I'm creating the first layer by stitching on thin wadding. The hand is easy to stitch through and you can get a nice tight well anchored finish.
Nearly finished the base layer.
Supersculpy
Nearly finished the base layer.
Supersculpy
Supersculpy is an oven baked clay that comes in beige or grey. It needs to be baked for 15min for each 6mm thickness at 130 degrees on a metal tray.
It can either be used in a block which can be quite heavy or over an armature (such as wire or tin foil) to create a thinner skin.
It requires warming up by working it in your hands to get to a good state. Fine details are easily achieved with sculpting tools and it is easy to pose your hand.
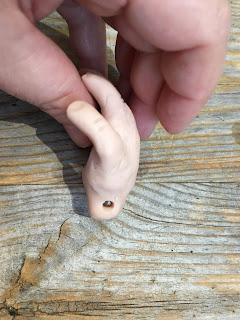
As you can see the hand has a slight curve to the fingers to give it the illusion of movement.
Before baking I have made a hole to allow me to attach the hand to the puppet arm.
This piece was just shy of 2cm thick so I baked it in the oven for 45mins.
Thermoplastic beads
Thermoplastic beads
These are beads that become soft when immersed in hot water allowing you to shape them by hand or press them into a mould. They can be stretched and twisted and are fabulous to use. Once cold they revert back to white plastic.
Put them into a dish that can take boiling water.
Boil the kettle and pour over the beads. Wait for all the beads to go translucent as below.
Once they have gone clear gather them up with a spoon or knife out of the hot water. You can handle them once they are out of the water but it will be warm.
Create your hand shape and once you are happy either leave it to cool or run it under cold water to 'set' it. If you need more working time just dunk it back into the hot water to soften it.
Put them into a dish that can take boiling water.
Boil the kettle and pour over the beads. Wait for all the beads to go translucent as below.
Create your hand shape and once you are happy either leave it to cool or run it under cold water to 'set' it. If you need more working time just dunk it back into the hot water to soften it.
The hand is very robust but hasn't got a large amount of detail and is quite heavy.
Foam
Upholstery foam makes very good puppet bodies, faces, limbs and hands. It is light and dense and easily shaped with scissors, knives and a scalpel. This is quite dense but as long as it has a closed cell (ie no bubbles) it will be suitable for use.
I have very quickly used scissors to shape this hand (so quickly I forgot the thumb!).
The foam can be covered in fabric such as lycra or fur by glueing or stitching it onto the foam. It will take needle felting directly into the surface or it can even be painted with a latex paint.
I have very quickly used scissors to shape this hand (so quickly I forgot the thumb!).
The foam can be covered in fabric such as lycra or fur by glueing or stitching it onto the foam. It will take needle felting directly into the surface or it can even be painted with a latex paint.
Eye Mechanisms
Eyes can be made out of all sorts according to your resources and the size of your puppet. I have used christmas baubles here for ease of demonstration but ping pong balls, wooden balls, cast resin and thermoplastic are all great options.
You need to create the pupil at the front centre for the eye.
Insert (or cast) a rod into the centre back of your eye to manipulate the eye ball.
Insert (or cast) a rod into the centre back of your eye to manipulate the eye ball.
There are a few ways the eyes can operate;
Up and Down
Side to side
Free rolling sockets
To create an up and down eye action the eyes need to pivot on a rod horizontally through the eyes. Try and get this as central as possible as this will effect the operation of the eyes.
To create an up and down eye action the eyes need to pivot on a rod horizontally through the eyes. Try and get this as central as possible as this will effect the operation of the eyes.
Mount these into the head with either a groove to hold the rod or a cup socket, it is important that the mount allows the rod to swivel.
An eyelid could be painted on the top of the eyeball to allow this puppet to blink when the eyes rotate down.
Video below to show mounting and operation of the up and down eyes
with one finger. This would be easier with a finger loop to hook your finger through.
A default eye position can be created with elastic attached to the connecting rod and the top or bottom of the head to encourage the eye up or down as is preferred, this needs to be flexible enough to allow you to pull it in the opposite direction.
Video below to show mounting and operation of the eyes. Note the connecting rod at the back needs to have a flexible join otherwise it will snap. I have created fabric hinges to allow this.
Video below to show the operation and movement of these eyes.


No comments:
Post a Comment